JEDWare philosophy for our 3CX reporting
JEDWare Philosophy for 3CX Reporting JEDWare Reporting for 3CX 3CX provides built-in reporting that works well for many customers, but
This Agent report will contain: ExtensionId, FullName, InboundAnswered, InboundLost, OutgoingAnswered, OutgoingLost, InternalAnswered, InternalLost, TotalAnswered, TotalLost, AnsweredProcent, LostProcent, TotalTalkTime, AverageTalkTime
The CSV end result for a JEDWare Agent Report, when imported to Excel, will look similar to the one below

In the JEDWare left menu, click Report -> Scheduled tasks, and click on the top menu CSV GENERATION

We do offer templates for:
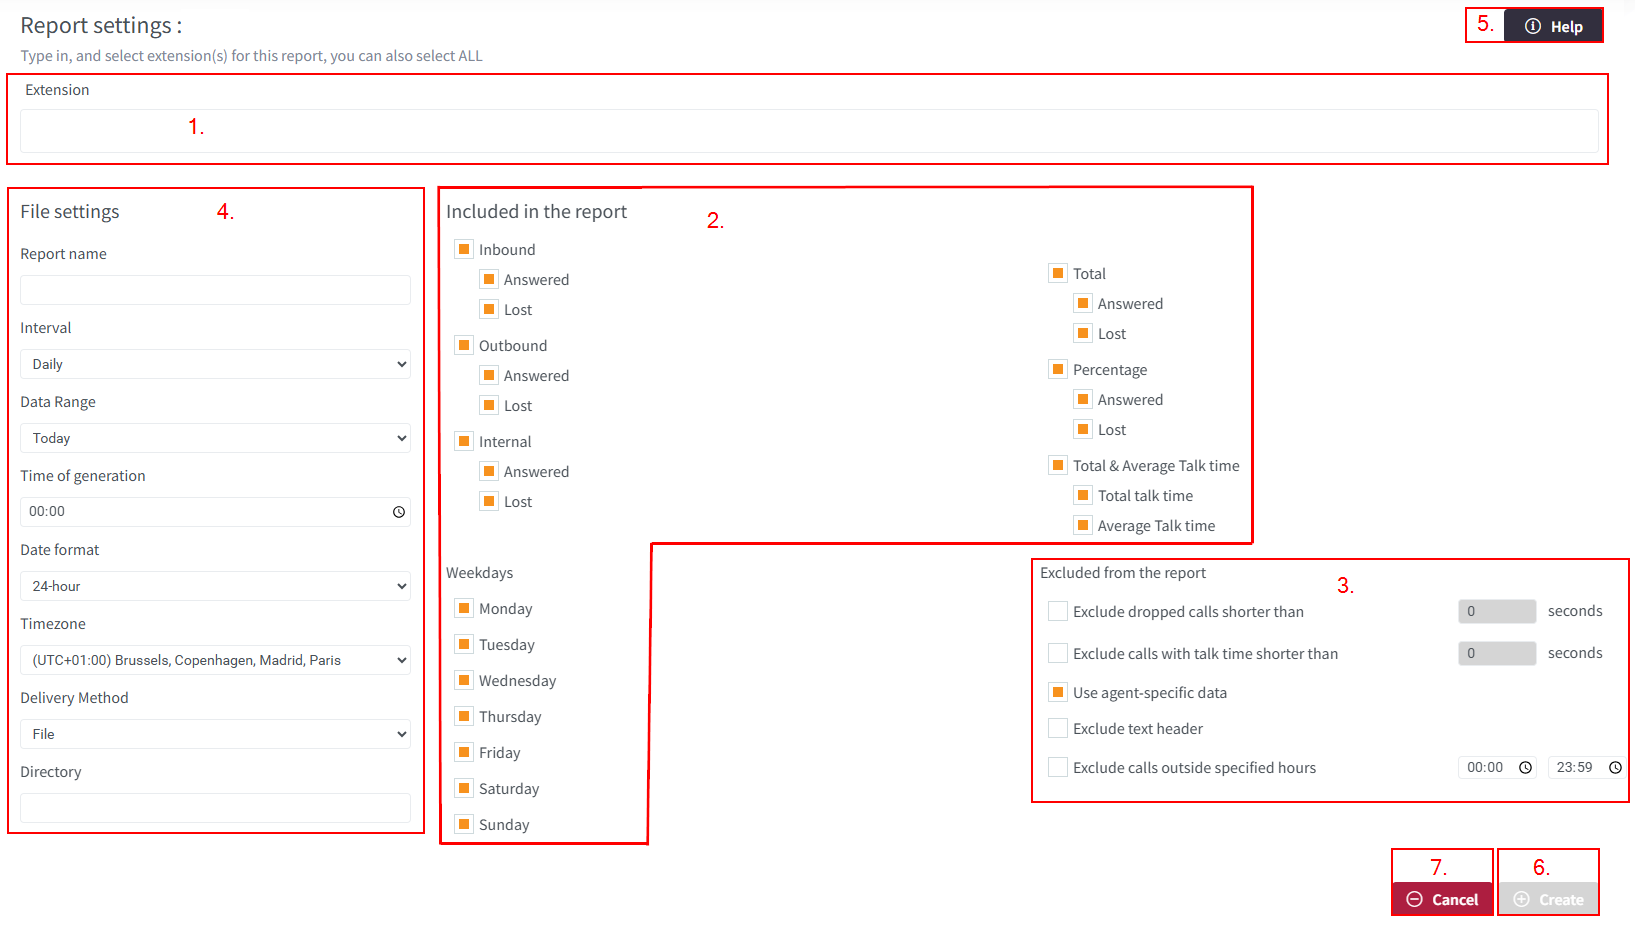


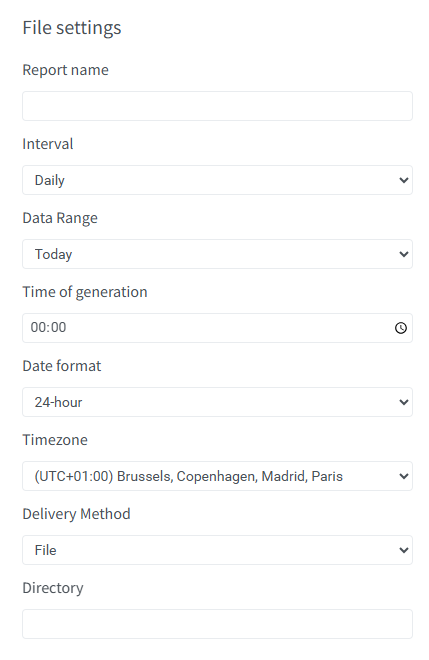
You can select Hourly, Daily, Weekly, or Monthly.
If you selected Hourly In the above Interval, you can now select
Hourly or Extended hourly with start and end time
If you selected Daily In the above Interval, you can now select Today or Yesterday
If you selected Weekly, you now have to select a day for this Report generation
If you selected Monthly you will have to select First or Last day of the Month for this report generation
This can be handy if the server is split between different Countries and this report is to be used at a specific timezone. Eg. the Server is placed in Norway, but the user that needs the report is placed in the US, here you can select a US TimeZone, and the report will use the US local timezone for the creation of this Report.
E-mail is quite simple, you can add one or several e-mails for this report (For several, please divide by a comma) We look out for if the email address looks correct and give it a Green Checkmark if it does.
If you select File upload, there are several things you have to have in your mind. We look out for if the path looks correct and give it a Green Checkmark if it does, but we cannot see if the folder exists and if the right rights are in place for this destination folder.
First, please choose the directory where you want your CSV files to be stored.
PLEASE NOTE, your 3CX Server has to have access to the folder you chose as the destination folder. We cannot check these rights from JEDWare, so make sure that your 3CX Server has the right to write in the selected folder.

Linux: /folder –
Example: if /opt then the file will be found at /opt/callhistory_xx-xx-2023.csv
Windows: Drive:/folder
Example: if C:/CSVfiles then the file will be found at C:/CSVfiles/callhistory_xx-xx-2023.csv
Your automatic CSV generation is now scheduled to run. If you chose to save as File on your Harddisk, you will be able to find the CSV files in the directory you have chosen, after the Time of generation, and if you selected to have the report e-mailed to you, it will arrive as soon as it has been created.
In the Tasks, you will find your Scheduled Reports. From here you can Enable / Disable the Schedule, you can edit the Scheduled Report, you can Delete your Schedules Report, and you are able to Run the report “right now”, to check out if your report settings are as expected.

Find more info for Scheduled Reports in the posts below
JEDWare Philosophy for 3CX Reporting JEDWare Reporting for 3CX 3CX provides built-in reporting that works well for many customers, but
3CX – CSV Report Generation for Excel or PowerBI In Scheduled tasks, you are now able to set up automatic
Limits and TIP for our Reports Limits of Reporting 3CX V18.x limit in Reports is 20.000 Rows (Calls), in the
Scheduled Agent Report to CSV upload or e-Mail JEDWare Agent Report This Agent report will contain: ExtensionId, FullName, InboundAnswered, InboundLost,
Scheduled Agent Report – Outbound to CSV upload or e-mail JEDWare Agent Report – Outbound This report will contain: ExtensionId,
Scheduled Agent Report – Total to CSV upload or e-mail JEDWare Agent Report – Total This Agent report will contain:ExtensionID,
Scheduled Group Report to CSV upload or e-Mail JEDWare Group Report This report will contain: ExtensionID, FullName, InboundAnswered, InboundLost, OutgoingAnswered,
Scheduled Group Report – Total to CSV upload or e-mail JEDWare Group Report – Total This report will contain:ExtensionID, FullName,
Scheduled Agent Status Report to CSV upload or e-mail JEDWare Agent Status Report This report will contain: ExtensionId, FullName, Available,
Scheduled Agent Status Group Report to CSV upload or e-mail JEDWare Agent Status Group Report This report will contain: ExtensionId,
Scheduled Agent Status Detailed Report to CSV upload or e-mail JEDWare Agent Status Detailed Report This report will contain: ExtensionId,
Scheduled Agent Status Detailed Group Report to CSV upload or e-mail JEDWare Agent Status Detailed Group Report This report will
Scheduled Queue – Availability Report to CSV upload or e-mail JEDWare Queue – Availability Report This report will contain: Queue,
Scheduled Queue Report to CSV upload or e-Mail JEDWare Queue Report This Queue report will contain: QueueExt, Agent Ext, Name,
Scheduled Queue – Per day Report to CSV upload or e-Mail JEDWare Queue – Per day Report This Queue report
Scheduled Queue – Inbound Activity Report to CSV upload or e-Mail JEDWare Queue – Inbound Activity Report This Queue –
Scheduled Ring Group Report to CSV upload or e-Mail JEDWare Ring Group Report This Ring Group report will contain: Ring
Scheduled All Calls Report to CSV upload or e-mail JEDWare All Calls Report This report will contain: is_answered, direction, start_date,
Scheduled Trunk Report to CSV upload or e-mail JEDWare Trunk Report This report will contain: TrunkID, TrunkName, DID, Total, Answered.
Scheduled Company total Report to CSV upload or e-mail JEDWare Company total Report This report will contain: TotalIndbound, TotalOutbound, TotalInternal,